I'm working on producing a series of pieces that will eventually form a body of work suitable for a solo exhibition.
My site of choice is the crypt at the National Trust property Monatcute House.

I think this location would be ideally suited to the collection as all the pieces need to be viewed with only their own light source to illuminate them. In this quiet atmospheric setting the pieces will have no competition from distracting peripheral noise. The setting should therefore give a feeling of calm serenity in which visitors can view the work and relate to the concept behind it.
With this in mind I have begun to construct ideas for the final piece by importing images of the proposed sails into photoshop and layering them in order to gauge the effect.

The image above has had a light effect added to simulate the effect of lighting the piece from the bottom edge.
After working on the design I realised that the four portraits did not fit the sails in a comfortable composition, so I chose a fifth, bottom left. This is a person I have no name for or any background information. I had the impression from her photograph that she may have been younger than the other ladies, maybe it has something to do with the 'Audrey Hepburn' eyebrows.
As the sketch developed I found that special connection that I'd had with the first portrait and I sensed an enquiring humorous character was looking back at me.

With the design for the portrait layer settled I made a small sample of the lace layer to see how this would work in reality, as a diffusing layer in the front of the piece.
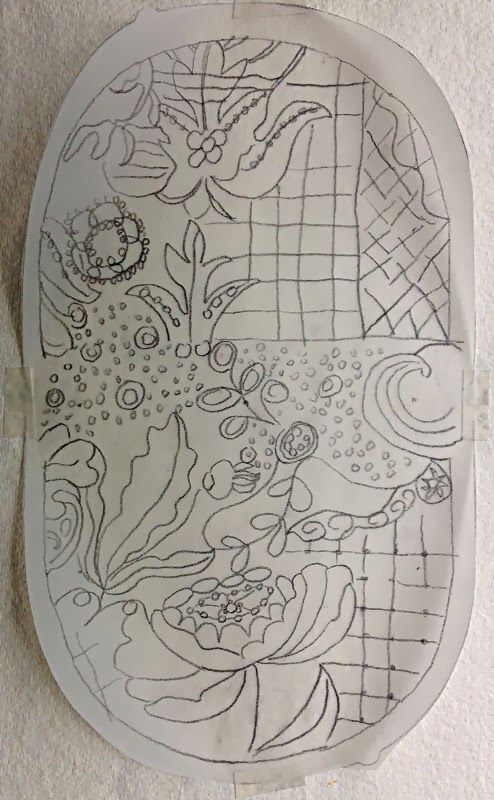
I traced off a small area of the full size lace design and imported it into the embroidery software. Due to a lack of expertise I had to reduce the size of the design to fit it into the hoop. In doing so I had some blank areas after I'd stitch it out.
I used this mistake to my advantage and incorporated some hand stitch embroidery into the undigitised areas. This will now be something I will do in the final stitching as it will make the joins between hooping easier to fill.

Thread colours were auditioned to tone with the light blue/grey thread that I had used for the machine embroidery. This was a deliberate choice as I wanted something pale that would allow the dark grey of the portraits to show through.
The colours of the hand embroidery were inspired by the detritus found on the shingle beach at Dungeness.


Having worked the second portrait in digital embroidery I then experimented with the effect of overlaying it with the lace.


I think the concept works well and will look even better when the two layers are mounted in a frame and can therefore be displayed with an appropriate distance of depth between the layers.
With this in mind I set about making a quarter scale cardboard frame for the first 2 layers, the portraits and the lace.

As you will appreciate at quarter scale it would have been very difficult to work with all five portraits. I therefore decided to use just one image, as the density of the embroidery of the layers is more important at this stage than the composition.

At this point I made the decision to drop back to designing panel three. This was because I was finally able to use the walnut shells that I had collected in France last year to dye the fabric for the panel.

The dying method requires the fabric to be boiled for about 3 hours and I hadn't been able to find an economical way to do this, until we bought a wood burning stove for our summerhouse. This meant that the fabric could be dyed in an eco friendly manner, using discarded wood.
The idea of using the walnuts had come from the original artwork for which I had used Parker Mocha writing ink.

I was hoping to bleach the fabric I've dyed to create the figures sketched in the above artwork in chalk. So far this has only been possible in a calico sample, the silk organza does not respond to the bleach. So experiments are ongoing as to how to interpret panel 3.
This is fascinating and very exciting. What a great use for your stove, who knew? You will be able to eco dye right out of the garden.
ReplyDeleteThis is getting really exciting. Hope the exhibition comes off!
ReplyDeleteyour stitched piece with added hand embroidery is beyond beautiful Sharon... would discharge paste work for the bleach task? Love that piece....the last image
ReplyDeletehttp://karenannruane.typepad.com/karen_ruane/
Am following this with interest,it is getting better and better.
ReplyDeleteSuch a lot of work and experimentation, Sharon, and so many techniques. This will be a fantastic series of pieces. I, too, hope you get the exhibition space you're hoping for. As you know, I don't sketch, but that connection you get with your subjects - I get the same thing when I'm using Photoshop to repair damaged family photos of great grandparents and other long-gone family members.
ReplyDeleteOh Sharon your hand embroidery is beautiful.....absolutely amazing work!
ReplyDeleteV x
It's developing so well Sharon. I remember visiting Montecute house a few years ago to see the array of samplers they had but I never saw the crypt area. That looks like it would be wonderful for your exhibition.
ReplyDelete