
For my 3rd PAP I decided I wanted to make a 3D functional object in the form of an accessory.
I had in mind perhaps a hat or a collar, having see some beautifully worked collars by www.zolibeau.com. who were exhibiting their work at a small tea room on the outskirts of Cardiff.
As is my usual habit I looked at a lot of inspirational work from artists and students, some of whom were from Chelsea College of Art, whom I’ve looked at before and some were from The London college of Fashion.
My first thoughts centred around colour and shape. In the mood board you can see a variety of ideas from other designers and themes, with a possible leaning towards flowers or geometric shapes.

4/12/1
I loved the shapes that Pao-Pa-Nga Siddhigu was creating with her folded shapes but when I started to do some paper folding it didn’t seem to work for me.
I then looked at possible colour combinations which I took from my travels in France.

4/12/2
After much deliberation I decided to go for the hat idea.

4/12/3
And made a mock up of a basic hat.

4/12/4

4/12/5
It was quite a simple design as I wanted the embroidery to be the main feature and I also wanted to produce a hat that I would like to wear.
The first hat needed some adjustment

4/12/6

4/12/7
Next I auditioned some fabrics using the colour mood board as a start

4/12/8
While thinking about how I would work the decoration, I cut up one of my felt samples and started to play with it on a strip of silk Dupion that I thought would work well with the sample, having used it in the making of it.

4/12/9
4/12/10
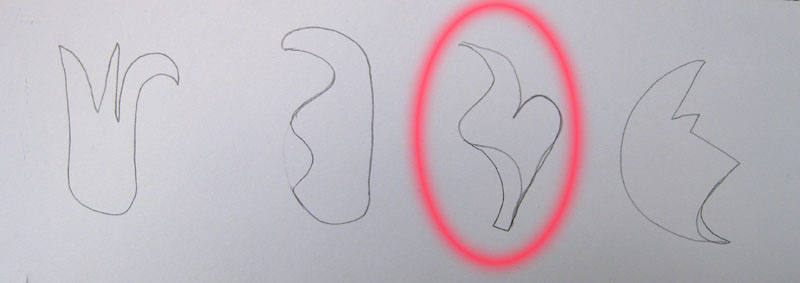
The shape I chose was one of the shapes used in chapter 9, a fleur de lis shape cut in half. I’d already noticed that the shape looked a little like a bird. Once I’d laid down a few of these pieces and offered up some cords made of felt, it gave me the impression of Elizabethan slip designs, with their connecting spirals and curved shapes. Thinking a bit further on they started to look a little bit like serpents.
This then gave me the idea to look at the negative shapes in the sample and I discovered that there were more shapes that began to feel like the mythical creatures in the bestiaries used by Elizabethan embroiderers.
They reminded me of the slips that were produced by Mary Queen of Scots and Bes Hardwick that I’d seen at Oxborough Hall.
My next challenge was how to attach the slips to the background. I added a layer of medium weight calico to the back of the band, for support and then offered up a piece of sheer in a pale maroon. This gave me the opportunity to stitch the slips in place without stitching into them and also created a pleasing padded appearance. Each shape was stitched using a running stitch and hand dyed silk thread, keeping very close to the edge of the slip.
Next I tried various ways of attaching the felt cords, as you can see in the sample, looking at surface attachment and positioning them under the sheer. I wanted to use gold to give the piece a feeling of opulence an also a refference to the Elizabethan embroidery.

4/12/11
I settled on couching them down with buttonhole stitch, in six strands of Madeira gold thread.

4/12/12
Once this was completed I stitched bead eyes to all of the creatures.

4/12/13
During my trip to France I discovered some Mica flakes on a mountain path and decided to see if they would work with the hat band, stitched down with loose gold thread stitches. This was also inspired by Elizabethan embroidery as they loved sparkle in the form of spangles. There are also some very small shards of sea shells that I found on a beach composed totally of broken polished shells.
To create a unifying element to the embroidery I created random patterns of running stitch around the applied elements using the same gold thread as I’d used for the cords, this time just ones strand.

4/12/14
Lastly I couched gold thread to the top and the bottom of the band to to give it definition.
I decided to create the band as a separate piece to the main hat, which meant that I could attach a lining by hand without the disturbance of bagging out required if it was an integral part of the hat.
This left me with a decision to make on the fabric of the main hat, which I felt had to be unobtrusive, so the eye would focus on the band. I chose white silk organza as it has body and it will keep it’s shape, it also made me think of a Bronte period style hat. This was enhanced when I attached the brim which consists of three layers, silk organza, silver metallic organza and the pale maroon sheer used for the band. The edges of the band have been left raw as I didn’t want any disturbance to the effect of the lightness of the fabrics and I also liked the slight loose effect of the frayed edges against the classical feel of the band.
Finally I attached the band to the hat with a small hemming stitch.

4/12/15

4/12/16

4/12/17

4/12/18
Once the design started to work I really enjoyed this piece and was quite surprised how it came about with the Elizabethan connection, again, although I suppose my research has been very focussed in that area.
It was, to a large degree, a hand stitch project as it was completely worked while I was away and only had intermittent use of my little sewing machine, so again this was a surprise to me as I am usually a resistant hand stitcher, particularly for a whole project.
Total hours 50
Research and design 12hrs
Embroidery 38hrs
Cost £14.70
Looking good!!!
ReplyDelete